![logo.png]](https://help.teamsense.com/hs-fs/hubfs/logo.png?height=40&name=logo.png)
What you need to get started
- All TeamSense plans can access this feature:
- Basic and Visibility plans can publish up to 2 forms at a time
- Action, Pro, and Enterprise plans can publish unlimited forms. - Role of Company-wide admin or division admin
- Time required: about 10–15 minutes for a simple form.
Steps
- Open Forms
- From your TeamSense admin portal, go to the Forms tab.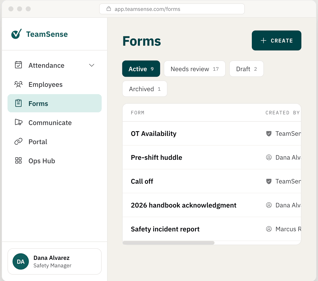
- Choose how you want to build it
- You’ll see your list of existing forms, if any, along with a button to create a new one.
- Start from scratch — add your own questions, put them in order, and branch follow-up questions based on how someone answers.
- Start from a template — pick a ready-made form for a common workflow (for example, a safety incident report, a pre-shift equipment checklist, or a pulse survey) and customize it from there. - Add and order your questions
- Describe it to the AI assistant — tell it what you need in plain language (for example, “Collect a pre-shift equipment checklist with pass/fail per item”) and it drafts a form for you. Keep asking for changes in chat until it’s right.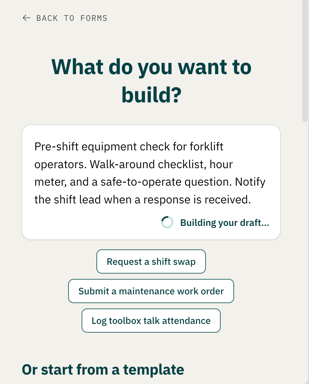
- Add questions one at a time, and reorder them as needed.
- Add a follow-up question to any answer choice to branch the flow based on how someone responds.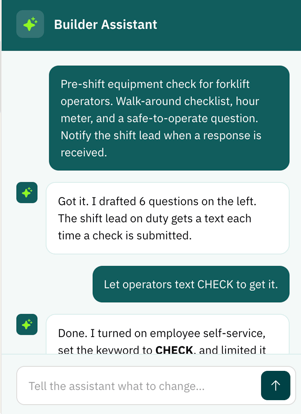
- Choose who can see and request the form
- Use Manage Form Access to control who can see the form, and whether employees can request it themselves by texting a keyword (for example, texting OVERTIME to request an overtime sign-up form).
- This keeps sensitive or role-specific forms from reaching employees who shouldn’t see them. - Set up response notifications
- Choose who gets notified the moment a response comes in: an admin, the submitter’s manager, or an outside email address.
- If the form is anonymous, it stays anonymous — notifications won’t reveal who responded. - Publish and send
- When the form is ready, publish it.
- Send it to your team over SMS — the same text thread your frontline already uses — or let employees request it themselves by texting its keyword, if you’ve enabled that. - Check your results
- Open the form to see how many went out, your response rate, and median completion time.
- Review the aggregate summary of answers, or look at individual responses.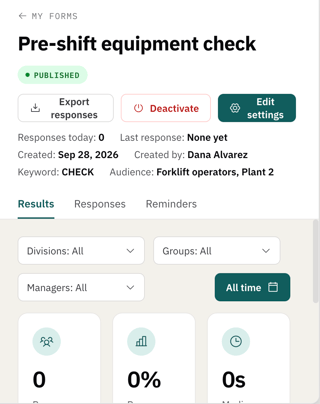
💡The builder only creates new forms. It can’t edit a form that was already published not using the forms tool — see Troubleshooting below if you need to change a live form.
💡 Every form is automatically translated into the languages your company has enabled — you don’t need to translate anything yourself.
Troubleshooting
- If you need to change a form that’s already live and wasn't built using the Forms tool:
the builder can’t edit it directly.
Recreate it from scratch, or contact support for help with the existing one. - If you’ve hit a limit and can’t publish a new form: your plan may be capped at 2 published forms (Basic and Visibility plans). Contact your account team to discuss upgrading.
- If your form won’t save and you don’t see a clear error: check each section of the form for a validation issue (for example, a required field left blank). Only one error shows at a time, and it doesn’t always point to which section it’s on.
- If a link you sent opens a login or dashboard screen instead of the form: try resending it, or have the recipient text in the form’s keyword directly.
- If your existing (legacy) forms suddenly look different: that’s expected. Turning on the new Forms experience updates the look of your Results, Schedules, and Reminders screens without changing how those forms work.
What is not currently supported: - Uploading a photo or document as part of a form response
- Importing an existing paper form or PDF into the builder
- Built-in approval steps (for example, PTO or overtime sign-up approvals) — approvals still happen outside the form
- Sending responses to Slack, Teams, your HRIS, or a ticketing system
- Routing notifications based on what someone answered, or to a role beyond an admin or the submitter’s manager
We would love to hear from you
Forms are a new, growing feature. A few things aren’t supported yet:
Have a use case for one of these? Let your account team know — we’re actively collecting this feedback to shape what comes next.
Need more help?Contact TeamSense Support or search the Help Center for “Forms.”